I love this sock pattern.
I've been stitching away diligently and have managed to finish one sock already. That's what's wonderful about long driving trips - get the hubby to do the driving and I get to knit away in the front seat. Then again, the twists and turns of mountain passes aren't always amenable to knitting. :-P
I cast on the second sock yesterday, got through the cuff and am just starting the pattern. Under normal circumstances I'd be able to finish this weekend, but this week is NOT normal. My Dad's 82nd birthday is just over a week away and I need to get started on his socks! The wool is in the mail, the pattern book is in the mail, the socks are NOT in the mail.
I'm likely to do a gentleman's sock from Knitting Vintage Socks by Nancy Bush. I love this pattern book and I've picked out the most wonderful burgundy wool from Koigu. Whether I stick with the Koigu or use the Lorna's Laces that's coming from the yarn store remains TBD. I figure I've got another day or two to sort that out.
On another note, my camera has left for a whirl-wind tour of the Orient. Hubby got on a plane last night for business trip that will take him to Singapore, Hong Kong, Shenzhen, Shanghai, Bangalore and Pune. His camera, while far superior, is large and a bit difficult to carry around. My little camera (bought for my trip up Mt. Rainier last year) is ideal to just put in your pocket and take snaps. Depending on how much of the infrastructure went with him, there may or may not be pictures of things for a while.
Thanks to everyone for their comments on my "Inside Out" socks and also for the recommendations on the sock blockers. It's neat to hear from folks out there in the wild - very inspiring!
My Socks ROCK!
They're done. They're DONE! THEY ARE DONE!!!!
My very first pair of socks. They are squishy - and springy - and they massage my feet with every wonderful step! So, without further ado, here are some pictures.

The socks were knit to be reversible, and the two sides are very distinct! The "reverse" side really shows the ribs and cables whereas the "normal" side is much more mellow. The striping is inherent in the yarn and had little to do with my knitting. I'd stitched in a few different sizes and never could really get the 'pooling' effect shown on the actual pattern. I know I'm not the only one that ended up with this color scheme; but I must admit, I really wanted to get that effect!

This is a better picture of the "normal" side and shows the cables more clearly. You can also see the ribbing that is on both the foot as well as the instep.
 Another view of the leg - with a better look at the short-row heel. I really liked this heel technique. It is unbelievable SQUISHY! It was challenging to knit since it is so dense and really curled up tightly on the needles. I knit using two circulars rather than four double-points, which may have made things more challenging, but who knows? I doubt I'll go back to double-points unless I have to (and I did for my Jaywalker socks).

In this view, they are both "reversed". Again, the ribs and cables are very visible.

Finally, a close-up of the pair; one right side, one wrong side. The light is a little crummy, but so it goes.
I'm excited about next month's sock! I can't wait for the yarn to arrive and to start poring over the pattern. I'm torn as to whether or not I should splurge and order the Addi Turbo needles (everyone seems to knit on them) and give them a shot. The Crystal Palace needles that I've been using don't have a good seam between the bamboo and the cable and it's been difficult to get the yarn to slide back on to the circular.
Whatever.
It's just more money to spend on knitting foo ... right?
My very first pair of socks. They are squishy - and springy - and they massage my feet with every wonderful step! So, without further ado, here are some pictures.

The socks were knit to be reversible, and the two sides are very distinct! The "reverse" side really shows the ribs and cables whereas the "normal" side is much more mellow. The striping is inherent in the yarn and had little to do with my knitting. I'd stitched in a few different sizes and never could really get the 'pooling' effect shown on the actual pattern. I know I'm not the only one that ended up with this color scheme; but I must admit, I really wanted to get that effect!

This is a better picture of the "normal" side and shows the cables more clearly. You can also see the ribbing that is on both the foot as well as the instep.
 Another view of the leg - with a better look at the short-row heel. I really liked this heel technique. It is unbelievable SQUISHY! It was challenging to knit since it is so dense and really curled up tightly on the needles. I knit using two circulars rather than four double-points, which may have made things more challenging, but who knows? I doubt I'll go back to double-points unless I have to (and I did for my Jaywalker socks).
In this view, they are both "reversed". Again, the ribs and cables are very visible.

Finally, a close-up of the pair; one right side, one wrong side. The light is a little crummy, but so it goes.
I'm excited about next month's sock! I can't wait for the yarn to arrive and to start poring over the pattern. I'm torn as to whether or not I should splurge and order the Addi Turbo needles (everyone seems to knit on them) and give them a shot. The Crystal Palace needles that I've been using don't have a good seam between the bamboo and the cable and it's been difficult to get the yarn to slide back on to the circular.
Whatever.
It's just more money to spend on knitting foo ... right?
Side Dishes for the Ragout
There were quite a few other ideas for accompaniments to the ragout mentioned below. Given that I'm a vegetarian, the likelihood of me making them is smaller - but my husband certainly wouldn't mind if I happened to pick up a nice roast on the way home.
Anyway, if you're looking for a reason to eat fewer mushrooms (why?), here are some suggestions. I think I'll stick with the portabellas.
VEAL MARSALA WITH
MUSHROOM RAGOUT
SERVES 4
1 recipe mushroom ragout (see above)
1 cup Marsala
1¾ pounds veal cutlets or skinless boneless chicken breasts, thinly sliced
½ cup flour
Salt and pepper, to taste
2 tablespoons olive oil
2 tablespoons heavy cream
2 tablespoons fresh parsley, finely chopped
Make the mushroom ragout, but don’t sprinkle with the parsley.
Pour the Marsala into the ragout and bring to a boil. Let the mixture bubble gently until the Marsala reduces by half. Transfer the mushroom mixture to a bowl; set aside.
Wipe out the skillet.
Place the veal or chicken between layers of plastic wrap. Using the side of a cleaver or a cast-iron skillet, pound the meat until it is ¼-inch thick. Place the flour, salt, and pepper in a large, shallow bowl. Coat the veal or chicken on both sides, patting off the excess.
Heat the skillet. Add 1 tablespoon of the oil. Add half of the chicken or veal, or enough to fill – but not crowd – the pan. Brown the meat over medium-high heat for 2 minutes on each side or until it is golden and cooked through. Transfer the meat to a platter.
Cook the rest of the meat in the remaining 1 tablespoon of oil in the same way, and then add it to the platter.
Return the mushroom mixture to the pan. Turn the heat to high. Cook, scraping up any brown bits clinging to the bottom of the pan, until the mixture comes to a boil. Lower the heat, stir in the cream, and taste for seasoning. Add more salt and pepper, if you like.
Return the meat with any liquid on the platter to the sauce, spooning the mushroom mixture over the meat. Heat just until the meat is hot. Sprinkle with parsley and serve at once.
TURKEY STEW WITH
MUSHROOM RAGOUT
SERVES 4
2½ pounds boneless turkey breast
1 tablespoon canola oil
2 onions, each cut into 8 wedges
4 tablespoons butter
Salt and pepper, to taste
3 tablespoons flour
2 cups chicken stock
1 cup water
1 recipe mushroom ragout (see left), omitting parsley
Peel off the turkey skin. Cut the meat along its natural lines into 3-inch pieces.
In a skillet, heat the oil. Add the onions and cook until they are browned on all sides. Remove them from the pan.
Add the butter to the pan. Add the turkey and sprinkle with salt and pepper. Cook for 2 minutes, then turn and cook the other side. Remove the turkey from the pan.
Sprinkle the flour into the pan. Cook, stirring, until the flour begins to brown. Pour in the stock and water. Let the liquids come to a boil and cook, stirring constantly to release the sediment in the pan. Return the onions and turkey to the pan. Let the mixture return to a boil. Lower the heat, partially cover the pan, and simmer the stew for 30 minutes or until the turkey is cooked through.
Stir the mushroom ragout into the pan. Let the stew simmer for 5 minutes more. Taste for seasoning, add more salt and pepper, if you like, and serve at once.
More Dinner Ideas
Found this mushroom ragout recipe in the Boston Globe. I'm a huge fan of mushrooms in general, and cooked mushrooms in particular, and with the weather being what it is this seems like a wonderful idea.
MUSHROOM RAGOUT
SERVES 4
2 tablespoons butter
2 shallots, finely chopped
2 cloves garlic, finely chopped
¼ pound oyster mushrooms, coarsely chopped
¼ pound shiitake mushroom caps, thinly sliced
¼ pound button mushrooms, coarsely chopped
¼ pound crimini mushrooms, coarsely chopped
Salt and pepper, to taste
½ cup white wine
2 tablespoons fresh parsley, chopped
In a heavy-based skillet, melt the butter. When it is foaming, add the shallots. Cook over medium-low heat, stirring often, for 5 minutes or until they are tender.
Add the garlic and cook, stirring, for 1 minute. Add the oyster, shiitake, button, and crimini mushrooms to the pan with plenty of salt and pepper. Stir well.
Cook over medium heat for 10 minutes or until the mushrooms give up some of their liquid.
Add the wine to the pan, turn up the heat, and, shaking the pan often, let the mixture bubble gently until the liquid evaporates.
Sprinkle with parsley and serve at once.
PORTOBELLO MUSHROOMS WITH ARUGULA
SERVES 4
4 tablespoons olive oil
8 portobello mushroom caps
Salt and black pepper, to taste
½ cup balsamic vinegar
Pinch of sugar
Pinch of crushed red pepper
¼ pound baby arugula
2 tablespoons chopped fresh thyme
¼ cup freshly shaved or grated Parmesan
In a large, heavy skillet, heat 2 tablespoons of oil. Add the mushrooms, stem end down, sprinkle with salt and black pepper, and cook over medium-high heat for 5 minutes, turning often, or until the mushrooms are tender. Transfer the mushrooms to a bowl.
Pour the vinegar into the skillet. Add the sugar and red pepper. Bring to a boil. Lower the heat and let the mixture bubble until it reduces to ¼ cup. Stir in the remaining 2 tablespoons of oil and heat through.
Divide the arugula among 4 salad plates. Top with mushrooms and juices from the skillet. Sprinkle with thyme and Parmesan cheese. Serve at once.
Book Review - Snow Flower and the Secret Fan
For the February, 2007 Book Club we read an amazing book about Chinese women in the late 19th century. The story centers around two girls - Lily, the second daughter of a poor, farming family and Snow Flower, the only child of a middle-class bureaucrat's family. We follow their arranged friendship from early childhood through marriage and old age.
Things that I liked the most were the crisp, almost terse prose and the sense of "calmness" of the writing. The voice of the narrator was almost elegant and somewhat languid in pace but it was never boring. I also have to give her tremendous credit for keeping this book short. We could have spent at least another 150 - 200 pages hearing about the trials, tribulations and life experiences of these two women, but the entire book was kept to a slim 288 pages. A very quick read - and very satisfying.
I would definitely recommend this book, in particular for anyone that's about to get on an airplane or take a short vacation. Also a great weekend book. Build up that fire and get reading.
Next month is The Canterbury Tales by Chaucer. I'll be pulling out my illustrated manuscript!
Book Details:
Title: Snow Flower and the Secret Fan
Author: Lisa See
ISBN: 0812968069
Binding: Paperback
Publisher: Random House
Copyright: 2006
The Next Sock Project
I'm almost done with my February STR kit (pix for sure this weekend) and must freely admit that I'm sad - nay, DESPONDENT - that I didn't get the "pooling" effect that others got. I also seemed to have, generally, less of the purple color and way more of the brown, green and gray. The second sock has gone much more swimmingly (unsurprising now that I understand the pattern) and so it's time for me to get cracking on my next sock pattern.
I've already bought the skein of yarn that I want to use, and I've found the pattern as well. Specifically, I'll be working the Jaywalker pattern from MagKnits. I like the diagonal pattern shown and I'm also interested in trying a top-down sock pattern. So far I've only done toe-up (like that idea way better since there's little risk of running out of yarn) but it's definitely time to try something new.
Rainy days are back in California so that means more time to knit ... or at least it seems that way ...
Tower of wool

The other big unfinished object in my stash is another Knitty sweater - this time it's the Eiffel. I love the lacy look of the bottom but will likely skip the ribbon going around the bust and the sleeves. Just too "cutsey" for me.

This time, the yarn is a Rowan DK Tweed. The picture doesn't do the color justice - it's much more of a "lime" than a "citron". The yarn is a bit harsher than the Jaeger, but I expect it to soften up over time. The original pattern calls for hemp yarn but I had a very hard time finding any. What little I did find would have made for one VERY expensive sweater.
I'm at the point were I go from the lace stitch to all 3x1 rib. It should go pretty darned quick now - particularly when I manage to get a few rounds of the rib going so that the yarn slides smoothly around the needle. If I did this pattern again (and I'll need to for the sleeves), I would likely break my own rule and use double-points rather than two circulars. The lace stitch just doesn't slide easily and that makes for much slower going than I would like.
Who said quickbreads were sweet?
A friend referred me to this recipe in the NYTimes for a savory quickbread. Here's the recipe:
Oil or butter for greasing pan
1 2/3 cups buttermilk or plain yogurt, or 11/2 cups milk and 2 tablespoons white vinegar (see Step 2)
2 1/2 cups (about 12 ounces) whole wheat flour
1/2 cup cornmeal
1 teaspoon salt
1 teaspoon baking soda
1/2 cup molasses.
1. Heat oven to 325 degrees. Grease an 8-by-4-inch or 9-by 5-inch loaf pan, preferably nonstick.
2. If using buttermilk or yogurt, ignore this step. Make soured milk: warm milk gently — 1 minute in the microwave is sufficient, just enough to take the chill off — and add vinegar. Set aside.
3. Mix together dry ingredients. Stir molasses into buttermilk, yogurt or soured milk. Stir liquid into dry ingredients (just enough to combine) then pour into loaf pan. Bake until firm and a toothpick inserted into center comes out clean, 45 minutes to 1 hour. Cool on a rack for 15 minutes before removing from pan.
Yield: 1 loaf.
Lighter Whole Wheat Quick Bread: Use 1 1/2 cups whole wheat and 1 1/2 cups all-purpose flour; omit cornmeal. Substitute honey for molasses. Beat 1 egg into wet ingredients in Step 3. Proceed with recipe.
You can find the article by Mark Bittman here. As simple and easy as this recipe looks, I'll likely give it a try tonight or tomorrow. There's buttermilk leftover from waffles and the gnocchi, so I may as well use it up. Few things in life smell more awful than buttermilk gone bad.
Totally tubular sweater

Wanted to start listing out some of the other knitting projects I've got going (besides socks, that is). Many of my projects come from Knitty - since they're very well described, the patterns are easy to follow and it's easy to find something I like!
This sweater is called Tubey and is knit similar to a shrug with a tube for the body attached to the bottom. The original pattern calls for a multitude of scrap yarn to get stripes all over the sweater, but I've got a wonderful stash of Jaeger Shetland Aran yarn that's just perfect for this pattern. Look at how luscious this yarn is!

When I first started working with this yarn, I was worried that it would be scratchy and not very comfortable. In reality, however, this yarn is amazingly soft and very easy to work with. I did a sweater in the orange version that was remarkably easy to cable and shows off the pattern beautifully.
As you can see from the picture above, I'm not very far along. I did get to the point where the two ends are joined to start knitting the actual sleeve and I expect that I can get the "shrug" part of the sweater done this week. Progress as it happens!
And now for something completely different ...
For a change of pace, rather than another kitting post - this one is about FOOD ... and WINE! Today was my hubby's birthday so I cooked dinner and we opened an AMAZING bottle of wine (from the other stash). Dinner was gnocchi. Specifically, a test recipe from Cook's Illustrated. I moonlight as a recipe tester (don't get too excited - you can sign up to do the same thing here. No complaining if the link is broken - I don't know how long the promotion is going.
Here's the recipe for the gnocchi:
We recommend using Calabro brand ricotta for this dish (part-skim ricotta can be substituted). The gnocchi can be rolled and cut in advance and refrigerated for up to 24 hours. To freeze the uncooked gnocchi, place baking sheet in freezer until gnocchi are firm, about 1 hour. Transfer gnocchi to a zipper-lock bag and store for up to 1 month. Thaw frozen gnocchi in refrigerator overnight or at room temperature for 1 hour before cooking as directed. To prevent gnocchi from cooling off too quickly, warm serving platter or individual serving bowls in 200-degree oven just before cooking gnocchi.
Gnocchi
2 large slices white sandwich bread, crusts removed and torn into quarters
1 pound (16 ounces) whole-milk ricotta cheese (part-skim ok, 15oz container also ok)
1 large egg
2 tablespoons minced fresh basil leaves
2 tablespoons minced fresh parsley leaves
Table salt
1/4 teaspoon ground black pepper
1 ounce Parmesan cheese, grated (about 1/2 cup)
1/4 cup all-purpose flour plus additional for work surface
Sauce
4 tablespoons unsalted butter, cut into 4 pieces
1/8 teaspoon table salt
1 small shallot, minced (about 2 tablespoons)
2 teaspoons minced fresh sage leaves
1 teaspoon juice from 1 lemon
1. For the gnocchi: Adjust oven rack to middle position and heat oven to 300 degrees. Process bread in food processor until finely ground, about 10 seconds. Spread crumbs on rimmed baking sheet and bake until dry and just beginning to turn golden, about 10 minutes, stirring once during baking time. Let cool to room temperature (you should have about 1/2 cup crumbs).
2. Line baking sheet with triple layer of paper towels. Spread ricotta on paper towels in even layer into approximate 12-inch square. Cover ricotta with second triple layer of paper towels and press firmly until top layer of paper towels is saturated. Peel back top layer of towels and discard. Grasp bottom layer of towels and fold ricotta in half; peel back towels. Grasp bottom layer of towels and flip ricotta onto baking sheet; discard towels. Transfer ricotta to food processor and pulse until curds break down into fine, grainy consistency, about eight 1-second pulses.
3. Using rubber spatula, beat ricotta, egg, basil, parsley, 1/2 teaspoon salt, and pepper in large bowl until well combined and fluffy. Add Parmesan, flour, and 1/2 cup bread crumbs; stir until well combined. Let dough rest, refrigerated, for 15 minutes.
4. Lightly dust work surface with flour. With floured hands, roll golf ball-sized pieces of dough into 3/4-inch thick rope, rolling from center of dough outward. Cut rope into ¾-inch-long pieces and transfer to parchment paper-lined rimmed baking sheet. Repeat with remaining dough.
5. For the sauce: Melt butter and salt in 12-inch skillet over medium-high heat, swirling occasionally, until butter is browned and releases nutty aroma, about 1 1/2 minutes. Off heat, add shallot and sage, stirring until shallot is fragrant, about 1 minute. Stir in lemon juice; cover to keep warm.
6. To cook gnocchi: While forming gnocchi, bring 4 quarts water to boil in large pot or Dutch oven over high heat. Add 1 tablespoon salt. Reduce heat so water is simmering, then gently drop half of gnocchi into water and cook until all pieces float to surface, adjusting heat to maintain gentle simmer. Continue to simmer until gnocchi are cooked through, about 2 minutes longer. Using slotted spoon, scoop gnocchi from water, allowing excess water to drain from spoon; transfer gnocchi to skillet with sauce and cover to keep warm. Repeat cooking process with remaining gnocchi. Using rubber spatula, gently toss gnocchi with butter until uniformly coated. Divide among warmed individual plates or serving platter and serve immediately.
Yeah, I should have taken a picture of the finished dish, but I wasn't that together. I served it with a tomato-basil sauce (rather than the brown-butter) because I couldn't justify that much more sin.
On the other hand, I did take a picture of the wine before it was all gone.

The bottle is a 1997 Ravenswood Zinfandel - one of the last bottles we purchased shortly before the winery went public. It did so back in (I think) 1999 and I was a proud shareholder. After about 2 years on the open market, it was bought by Constellation Beverages - yes, these are the same people that bring you Thunderbird, Maneschewitz and other no-name beverages. On the other hand, they also own Mondavi, Simi, and other "top tier" wineries in California and the US. I have to admit, however, that I think Ravenswood's quality has gone down - while the prices for their vineyard designate vintages have gone up. I'm truly sad. They were my favorite. Regardless - this 10 year old zinfandel was INCREDIBLE.

There were notes of cherry, oak, tobacco - and things I can't describe. There are no more Cookes down in the cellar, though we do still have a few Teldeschi, Gregory, Dickerson and McGill's. This is the year that the corks get pulled! The remodel is coming (which means our basement/house will be torn up for the better part of 8 months) and these wines are definitely on their last legs.
Anyway - a nice change from knitting (though the first sock is done). Cheers!
Turning the heel
So I've rounded the corner and am on the home stretch of the first sock. Yes, it should have been done by now, but let's just say that I'm effectively knitting three socks instead of two. :-) Also, I've had my first run-in with the 5-1-5 cable. I've been so schooled by this pattern to knit TIGHTLY that I forgot about the looseness required for easy cabling. I also don't have a cable needle that's the equivalent of a 0 knitting needle, so it's bit more "interesting". I suspect there's at least one more trip to the knitting store tomorrow to pick up some 0 double-points. Might even be easier to work the leg on double points rather than two circulars.
No pictures today - I'll take some tomorrow when I (hopefully) finish up the first sock. Then I've got to get back to my book club book. It's due next weekend!
No pictures today - I'll take some tomorrow when I (hopefully) finish up the first sock. Then I've got to get back to my book club book. It's due next weekend!
More sizing musings - addressing the "foot"
In helping a fellow knitter with smaller feet, I've managed to work out the following to make a smaller "foot" portion of the sock.
Specifically, johussion measured her foot and got to a completed toe that is made up of 52 stitches. Looking at the STR pattern, there's an approximately 25% increase in stitch count from toe to foot to compensate for the rib and the smaller needle gage. Doing some simple math gets us to a target of 64 stitches all around for the foot (52 stitches plus 25%).
Here's the hard part - given the [p1, k2] rib on the instep and the [p2, k2] rib on the sole, it take a little fiddling to work it out. Also, the set-up row is done in groups of 7 and 8.
Using the "new math", I ended up with this for the next two rows:
Set-up round: P1, [k2, p1, k1, kfb] 5 times - 31 instep stitches. K1, kfb, [k2, p2, k1, kfb, p1] 3 times, k2, p1 - 30 sole stitches, 61 total stitches
Round 1: [P1, k2] 12 times, [p2, k2] 6 times, p1
Now, the instep will have 10 k2 ribs and the sole will have 8 k2 ribs. Knit away and turn the heel a little later - likely at 1.5" from the heel rather than 1.75", given that we're working with a smaller number of stitches overall.
Last part of the pattern is for the leg and it's worked in repeats of 24. That means trouble. We've got 61 stitches coming off the toe - and that's 13 more than two repeats and 11 less than three repeats (standard pattern has 3 repeats). Should you will fill the gaps with purl stitches? Increase around the leg to get up to 72? I really don't know. I suspect johussion and I will figure this out when she turns the heel. It's all about the sizing, you know.
Progress is being made ...
It's been three days since I received my sock yarn and I feel like I'm getting somewhere. I haven't had any large blocks of time to work on it, but it's still satisfying to see that there will be a pair of socks one day!
From some of the other knitters, I've seen some cool "pooling" of colors. Specifically, here's the first one I saw with cool "teeth" and "points". My socks, on the other hand, are looking more like ordinary "self-striping" yarns.
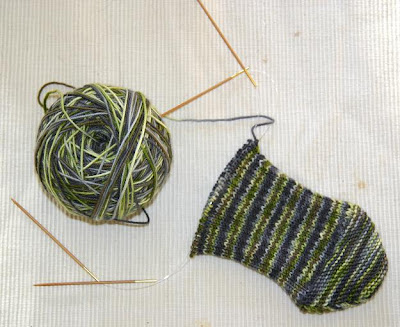
I'm trying to keep a positive attitude and convince myself that this color pattern is cooler than everyone else's - and also that things may be very different with the second sock! Others have advised to rewind the ball in the opposite direction (that would pose a problem with the twist of the yarn) and heck - I don't WANT to rewind the ball! It looks so good ...

Nope - I'll march on. I'll knit on (and purl on and W&T on) and see how the sock comes out. I expect to finish one of the two w/in the next day or so. Tomorrow's a vacation day from work and I'm looking forward to some concentrated knitting. It is therapy, after all.
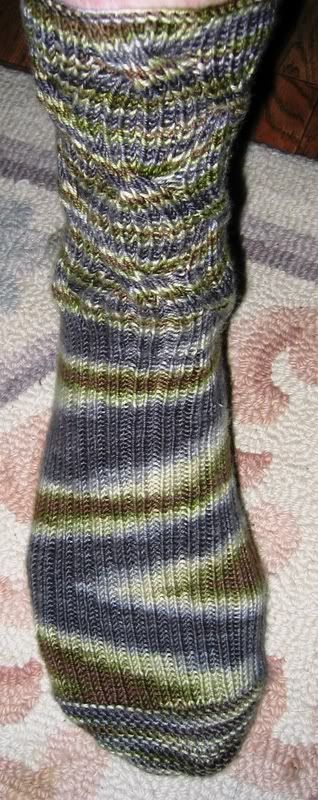
Sizing The Sock
When trying to size the sock to fit my feet, the big thing to worry about is the size of the toe. For the February sock pattern, the toe is created by casting on stitches and then using the wrap and turn technique to create the toe. It's not a true "toe-up" pattern - it's more like a "toe around" pattern.
Measuring to confirm the size of the toe starts by figuring out how wide the toe box should be. That's accomplished by measuring across the base of the toe, as shown in this picture:

From the picture, you can see that the correct width is 4". Double that to 8" and that's the "circumference" of the toe box. Here's a picture of the finished toe (and the start of the foot):

Changing the sizing for the foot itself is a little more difficult as it requires understanding the pattern repeat. The instep is a 2 x 1 (3 stitch) repeat and the sole is a 2 x x (4 stitch) repeat. I'll talk about that when I have time later tonight.
Let the Knit-a-long Begin!
Wonder of wonders, my shipment from Blue Moon showed up today - a beautiful skein of hand-dyed merino superwash wool and a wonderful pattern for reversible socks. They look great! I'm excited to get started on the pattern, but first a picture of the skein as it arrived:

It's amazing at how soft and supple the yarn is. I always grew up with "scratchy" and rough wool - the merino blend is amazing. While hard to show, the color mix goes from gray to purple to yellow to green.

I'm now merrily winding it in to the usual ball and I'll take pictures as the sock progresses. It's so exciting! The pattern is simple and it seems like I should have no trouble getting it done before the next pattern shows up. Woo hoo!
Kick-starting the Blog
Yeah, so this is embarrasing. It's been almost 8 months since I've done anything here - and all I've got are excuses. So, let's review:
Best of all - I've got a fun-filled and action-packed year of knitting coming up. I've joined the "Rockin' Sock Club" sponsored by Blue Moon Fiber Arts. I get six shipments of sock yarn (one every two months) along with a pattern. That means I'll be upping my personal stash of socks (heck - I'm DOUBLING it!) and trying out some really fun new techniques. Pictures and progress posted here as I get the yarn and start knitting.
The weather is getting better and it's time to start the new year off more productively.
Happy Knitting!
- Restructuring at work. After taking on 1/2 a person back in Nov. '05, I got a whole additional person in June. I'm now doing the work of 3.
- Refereeing. Still working on getting my Grade 6 badge, which meant that pretty much every weekend was spent on the pitch. At least four different leagues (including College) so that took up weeknights as well and a trip to Florida for the Super-Y national championships!
- Illness. All that work and referee stuff resulted in an AMAZING bout with the flu. That took up a good chunk of January with a minor relapse last month
Best of all - I've got a fun-filled and action-packed year of knitting coming up. I've joined the "Rockin' Sock Club" sponsored by Blue Moon Fiber Arts. I get six shipments of sock yarn (one every two months) along with a pattern. That means I'll be upping my personal stash of socks (heck - I'm DOUBLING it!) and trying out some really fun new techniques. Pictures and progress posted here as I get the yarn and start knitting.
The weather is getting better and it's time to start the new year off more productively.
Happy Knitting!
Subscribe to:
Posts (Atom)