It's December 30th and I really don't know where this year has gone. There's been good, bad and ugly (as usual) but my biggest area of bad and ugly was exercise. Or, the lack of it.
I let myself go this year. Quite a bit, actually. Sure, I'd had some injuries and the weather was bad, but it's like I fell out of love with running. There were times when it was fantastic, but those really were the exception rather than the rule.
Times like these require dire measures. Yup, it's time to call on The Marathon.
I've therefore selected the Avenue of the Giants marathon, run in 2011 on May 1st. Hal Higdon has once again provided the training regimen (I'll be using Intermediate I, for those playing along at home) and I'm inserting myself at Week 2. Given that I'm not a hopeless lout, that should be fine.
Oh, and just to make it stick, I'm firing up the 100 Pushups regimen again. The strength training is important, so I'm gonna do it.
Did I run yesterday? Yes. 5.5 miles.
Did I run today? Yes. 5 miles (or so. Calf complained).
Will I run tomorrow, Saturday and Sunday? Yes. 5, 7, and 9, respectively. By Monday morning, there'll only be 70 runs to go. Doesn't seem like all that many, does it?
A finished tote
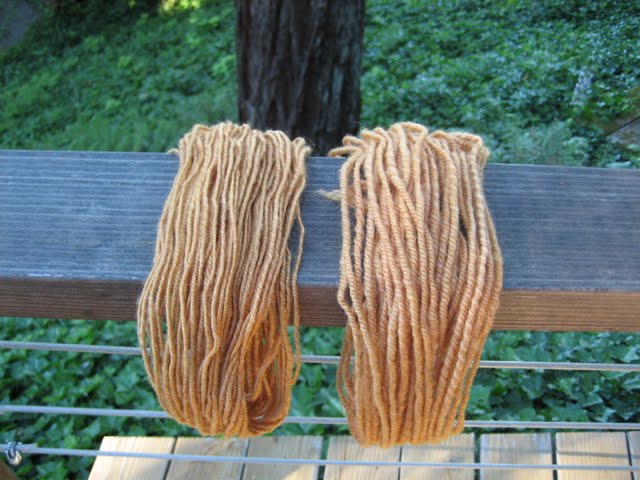
Perhaps you'll remember a while back (Ok, a really long while back) my last post was about weaving for the Pick Up Tote from Woven Treasures. Well, I'd finished the weaving all the way back on Labor Day weekend and I've finally gotten the gumption to finish the bag.
My skills as a seamstress are laughable at best but I know enough to do pretty well. Anyway, here's the result:

Yup, it's a tote. The straps were sewn on relatively straight and the fabric wasn't stretched out of shape too much. As you can see, I added a gusset at the bottom to give it some structure.

Finally, when it came to finishing, I wasn't happy with the idea of just folding over the edges twice and top stitching. So, I used a length of bias tape to encase the open edges of both the woven fabric and the liner.

Now, having done this first one, I have a much better understanding of what I need to do differently next time so that my finished seams are better, the bag is more square, the handles are better and that it'll generally look more professional. Admittedly, I was in a bit of a rush this morning so I wasn't as careful about any of the details as I could have been. Honestly, I'm ok with that since this really was meant to be an experiment.
Whilst cleaning up, I nearly put away the belt shuttle for my inkle loom. As I had it in my hand, I chuckled a bit and thought, "No, this is going to be getting used, possibly even tonight. It can stay on the table."
I love this tote. Love.It. Don't worry Sara, the next one will be better. :-)
My skills as a seamstress are laughable at best but I know enough to do pretty well. Anyway, here's the result:
Yup, it's a tote. The straps were sewn on relatively straight and the fabric wasn't stretched out of shape too much. As you can see, I added a gusset at the bottom to give it some structure.
Finally, when it came to finishing, I wasn't happy with the idea of just folding over the edges twice and top stitching. So, I used a length of bias tape to encase the open edges of both the woven fabric and the liner.
Now, having done this first one, I have a much better understanding of what I need to do differently next time so that my finished seams are better, the bag is more square, the handles are better and that it'll generally look more professional. Admittedly, I was in a bit of a rush this morning so I wasn't as careful about any of the details as I could have been. Honestly, I'm ok with that since this really was meant to be an experiment.
Whilst cleaning up, I nearly put away the belt shuttle for my inkle loom. As I had it in my hand, I chuckled a bit and thought, "No, this is going to be getting used, possibly even tonight. It can stay on the table."
I love this tote. Love.It. Don't worry Sara, the next one will be better. :-)
A little weaving
I picked up a copy of Sara Lamb's Woven Treasures and I used it to do a woven band on my inkle loom a few months ago. However, I'd not done any of the projects yet and, when I started thinking about a new tote, this seemed like as good a time as any.

I've had some struggles with this project and I've learned a lot - which is why we do this, right?
First, a few details about the project.
Warp: Tahki Cotton Classic
Sett: 20epi using two 10epi heddles
Weft: Aunt Lydia's #10 Crochet Cotton
Draft: plain weave, warp faced
Loom: Schacht Flip, 20"
Inspiration: Pick Up Tote from Woven Treasures
1. Cotton Classic is a \*slippery\* yarn. It also is Big.
I struggled in getting tension constant when tying on the front apron. In hindsight, I should have tied in smaller groups (forget the 1" suggestion, 1/2" would have been better). I reknotted umpteen times, even after weaving a (short) header and inserting the sticks. I also should have pushed the knotted sections closer together. It's a little uneven at the start.
2. Tension is critical. CRITICAL!
Because I don't have a stand for my loom, I have to be creative in clamping it to work surfaces. With the softly beaten projects I've worked in the past, the clamping force required has been much less. On this project, I was constantly overpowering the lame little clamps that came with the loom and it was very difficult to muscle the heddles around to help clear sheds. I finally gave in and found the woodworking clamps out in the workshop and used them to properly secure the loom. I'm now moving heddles with confidence and am moving much more quickly. I'm also paying much more attention to the tension on the warp yarns to really make sure the ends will move past each other. Giving the beams that extra turn makes a huge difference.
3. 20epi is, indeed, as difficult as Sara points out.
For the first inch or so, I was working quite hard to get the ends to move past each other. they really are quite crammed into the slots given that there are three ends per and it's hard to get them to behave. My pick-up stick has been a godsend here and I'm using it to clear each and every shed before passing the weft. It's saved my bacon at least once in about every 4th or 5th shed.
4. 22 epi would be a better sett, indeed.
The fabric is still just a bit open, though once off the loom and washed, it may tighten up a bit more. I can see bits of daylight between the ends but I really can't see trying to warp this at 24epi on the Flip.

Overall, now that I've mostly sorted my process issues, I'm really enjoying this project. It's going very fast since the ppi number is low and I'm quite happy with the way the colors look. They're vibrant and cheery and I think this will make a great tote once completed.
Next step finish weaving the fabric and then warp the inkle for the band.
I've had some struggles with this project and I've learned a lot - which is why we do this, right?
First, a few details about the project.
Warp: Tahki Cotton Classic
Sett: 20epi using two 10epi heddles
Weft: Aunt Lydia's #10 Crochet Cotton
Draft: plain weave, warp faced
Loom: Schacht Flip, 20"
Inspiration: Pick Up Tote from Woven Treasures
1. Cotton Classic is a \*slippery\* yarn. It also is Big.
I struggled in getting tension constant when tying on the front apron. In hindsight, I should have tied in smaller groups (forget the 1" suggestion, 1/2" would have been better). I reknotted umpteen times, even after weaving a (short) header and inserting the sticks. I also should have pushed the knotted sections closer together. It's a little uneven at the start.
2. Tension is critical. CRITICAL!
Because I don't have a stand for my loom, I have to be creative in clamping it to work surfaces. With the softly beaten projects I've worked in the past, the clamping force required has been much less. On this project, I was constantly overpowering the lame little clamps that came with the loom and it was very difficult to muscle the heddles around to help clear sheds. I finally gave in and found the woodworking clamps out in the workshop and used them to properly secure the loom. I'm now moving heddles with confidence and am moving much more quickly. I'm also paying much more attention to the tension on the warp yarns to really make sure the ends will move past each other. Giving the beams that extra turn makes a huge difference.
3. 20epi is, indeed, as difficult as Sara points out.
For the first inch or so, I was working quite hard to get the ends to move past each other. they really are quite crammed into the slots given that there are three ends per and it's hard to get them to behave. My pick-up stick has been a godsend here and I'm using it to clear each and every shed before passing the weft. It's saved my bacon at least once in about every 4th or 5th shed.
4. 22 epi would be a better sett, indeed.
The fabric is still just a bit open, though once off the loom and washed, it may tighten up a bit more. I can see bits of daylight between the ends but I really can't see trying to warp this at 24epi on the Flip.
Overall, now that I've mostly sorted my process issues, I'm really enjoying this project. It's going very fast since the ppi number is low and I'm quite happy with the way the colors look. They're vibrant and cheery and I think this will make a great tote once completed.
Next step finish weaving the fabric and then warp the inkle for the band.
Sampling for fun and profit
Phase two of the Great Sweater Spin-Up is sampling. This is something that I've never really done before. When I spun for the Wisteria sweater last year, I pretty much dove in with the lovely merino, did a three-ply with my default single and just went where the yarn took me. I ended up with a yarn that was close to worsted weight and it ended up knitting into a really nice sweater. I'm very happy with the result but my explorations over the past three days have shown me that I can do better if I slow down and think about what I'm doing.
One thing I'm *not* doing as part of this experience is woolen versus worsted spinning. The Blue Faced Leicester roving that I've purchased is a long wool and therefore wants to be spun worsted as much as possible. It started out life as combed top, but the act of dyeing will disorganize the fibers somewhat so it's no longer "top" in the strictest sense. Regardless, I'll be spinning it worsted as long my hands and patience will allow. So, on we go.
Step 1: Determine a target single wraps per inch (WPI)
Sandi is asking us to use a yarn that knits up at 5.5 or 6 stitches per inch (SPI) - that means a DK to light worsted finished yarn. However, since this is a cardigan and I'd like to knit at 5.5 SPI so that it's a bit denser, I pulled out some worsted yarns that have gotten me that gauge in the past. Specifically, I pulled out Cascade 220 - this knits up to 5.5 stitches per inch with a drape that I like.
Next, to get a target WPI for my single, I separated the strand of yarn into its constituent plies. Then, I took one of the singles, along with my control card, and tried to figure out which one was close.
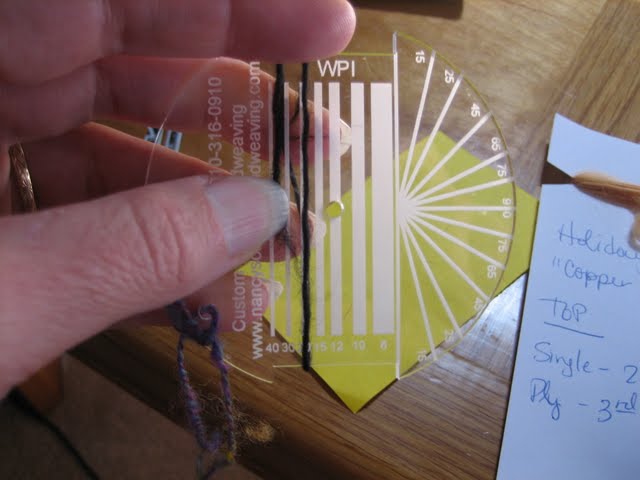
From the picture, you can see that the single is close to 20 WPI. It was a bit of a challenge to get an accurate measurement that wasn't stretching the single, but I decided this was good enough to get a start. Another thing to keep in mind is that the finished yarn will bloom (increase in size) after it's washed and dried. So, I chose 20-25 WPI as a good starting point for my single.
Step 2: Sample singles and ply - first try
Armed with a target WPI for my singles, I sat down at the wheel and started spinning. I knew that the end yarn would be a true three-ply so I made sure to spin that way from the first. I set up my wheel as I normally would, grabbed about an ounce of fiber, split it into three roughly equal parts and had at it.
I kept my control card with me throughout the spinning and used it to ensure that I stayed close to my target. In the end, I kept drifting to a smaller single despite increasing the tension and slowing my treadling - generally between 25 and 30 WPI. I also took a length of the single at the beginning and end of each bobbin and made an "instant yarn" by letting it ply back on itself, again, to see if I was close. While the single was a doubtless a bit thin, the ply experiments looked quite close to the Cascade 220. Therefore, I soldiered on, finished all three singles and then plied. It still looked thin, but I was counting on a good bloom to the yarn when it was done. In the end, I got a lovely yarn that was too thin - on it's way to sport weight rather than DK.

Step 3: Sample singles and ply - second try
Given that I couldn't convince myself that this yarn would be anywhere close to where I wanted to end up, I went ahead and did a second round of sampling. Clearly, I needed to get more fiber into the yarn and just increasing the tension more and slowing my treadling further wasn't going to cut it.
Enter Judith.
I've been lucky enough to take three classes with Judith now and each time only a small portion of her knowledge seems to make it into my brain. This last time we were spinning silk and she often reminded us that each of us has a natural spinning rhythm. That said, we also needed to embrace that rhythm and learn to adjust the wheel so that our natural rhythm would yield the desired yarn. I didn't fully grasp that until this particular moment.
Go down to a lower whorl (equivalent of slower treading) and adjust the take-up to work with that whorl and then see what happens.
Magic. Absolute magic. Those poor whorls sitting on the high end of my Julia - long suffering as I bemoaned my inability to spin fatter gauge yarns. Feh. I eventually popped up two whorls above my default single and suddenly I was spinning a single that was 20 WPI with ease. I felt that I could have gotten to an even fatter single without too much fiddling at that pace. Fantastic! I quickly (and I do mean quickly!) finished spinning up the singles, plied my skein (few beats per length since it needs fewer twists per inch) and sent it off for a bath. What a result.


I also learned that my control and consistency improved if I split the roving lengthwise before starting to spin. Again, given that this was no longer strictly top, I wasn't doing myself or the fiber a disservice by manipulating it a bit to make the spinning easier. I'll keep doing this going forward.

Step 4: Swatching for gauge
Now satisfied that I had a yarn that was a good candidate for the cardigan, I grabbed my needles and started swatching. I know that I'm generally a loose knitter and that means I use a smaller needle than most so I grabbed a US4 and cast on for a stockinette swatch. I knitted away for 15 rows and then measured. The swatch was measuring five SPI but the stitches looked a lumpy so, I ripped back, stayed on 4s and knit more tightly. This attempt yielded a honest 5.5 SPI and was happy with the horizontal gauge, but again, the stitches looked lumpy - as if they were too vertically compressed. That led me to rip back again, move up to a US5 needle and end up with this result:

It's perfect. An honest 5.5 stitches per inch and I really like the proportion of the stitches versus rows and even the little bit of twisted cable looks tidy. How much do I love this swatch? This much:

And let's not even get started on the color. It's fabulous. It shines (thank you, BFL!) and it is warm as the last sunny day before winter sets in (thank you, Jennifer!). I want to pet this yarn and this swatch forever. I can't wait to make this cardigan so I can wrap myself in squishy honey. Now it's all about filling the bobbins.
One thing I'm *not* doing as part of this experience is woolen versus worsted spinning. The Blue Faced Leicester roving that I've purchased is a long wool and therefore wants to be spun worsted as much as possible. It started out life as combed top, but the act of dyeing will disorganize the fibers somewhat so it's no longer "top" in the strictest sense. Regardless, I'll be spinning it worsted as long my hands and patience will allow. So, on we go.
Step 1: Determine a target single wraps per inch (WPI)
Sandi is asking us to use a yarn that knits up at 5.5 or 6 stitches per inch (SPI) - that means a DK to light worsted finished yarn. However, since this is a cardigan and I'd like to knit at 5.5 SPI so that it's a bit denser, I pulled out some worsted yarns that have gotten me that gauge in the past. Specifically, I pulled out Cascade 220 - this knits up to 5.5 stitches per inch with a drape that I like.
Next, to get a target WPI for my single, I separated the strand of yarn into its constituent plies. Then, I took one of the singles, along with my control card, and tried to figure out which one was close.
From the picture, you can see that the single is close to 20 WPI. It was a bit of a challenge to get an accurate measurement that wasn't stretching the single, but I decided this was good enough to get a start. Another thing to keep in mind is that the finished yarn will bloom (increase in size) after it's washed and dried. So, I chose 20-25 WPI as a good starting point for my single.
Step 2: Sample singles and ply - first try
Armed with a target WPI for my singles, I sat down at the wheel and started spinning. I knew that the end yarn would be a true three-ply so I made sure to spin that way from the first. I set up my wheel as I normally would, grabbed about an ounce of fiber, split it into three roughly equal parts and had at it.
I kept my control card with me throughout the spinning and used it to ensure that I stayed close to my target. In the end, I kept drifting to a smaller single despite increasing the tension and slowing my treadling - generally between 25 and 30 WPI. I also took a length of the single at the beginning and end of each bobbin and made an "instant yarn" by letting it ply back on itself, again, to see if I was close. While the single was a doubtless a bit thin, the ply experiments looked quite close to the Cascade 220. Therefore, I soldiered on, finished all three singles and then plied. It still looked thin, but I was counting on a good bloom to the yarn when it was done. In the end, I got a lovely yarn that was too thin - on it's way to sport weight rather than DK.
Step 3: Sample singles and ply - second try
Given that I couldn't convince myself that this yarn would be anywhere close to where I wanted to end up, I went ahead and did a second round of sampling. Clearly, I needed to get more fiber into the yarn and just increasing the tension more and slowing my treadling further wasn't going to cut it.
Enter Judith.
I've been lucky enough to take three classes with Judith now and each time only a small portion of her knowledge seems to make it into my brain. This last time we were spinning silk and she often reminded us that each of us has a natural spinning rhythm. That said, we also needed to embrace that rhythm and learn to adjust the wheel so that our natural rhythm would yield the desired yarn. I didn't fully grasp that until this particular moment.
Go down to a lower whorl (equivalent of slower treading) and adjust the take-up to work with that whorl and then see what happens.
Magic. Absolute magic. Those poor whorls sitting on the high end of my Julia - long suffering as I bemoaned my inability to spin fatter gauge yarns. Feh. I eventually popped up two whorls above my default single and suddenly I was spinning a single that was 20 WPI with ease. I felt that I could have gotten to an even fatter single without too much fiddling at that pace. Fantastic! I quickly (and I do mean quickly!) finished spinning up the singles, plied my skein (few beats per length since it needs fewer twists per inch) and sent it off for a bath. What a result.
I also learned that my control and consistency improved if I split the roving lengthwise before starting to spin. Again, given that this was no longer strictly top, I wasn't doing myself or the fiber a disservice by manipulating it a bit to make the spinning easier. I'll keep doing this going forward.
Step 4: Swatching for gauge
Now satisfied that I had a yarn that was a good candidate for the cardigan, I grabbed my needles and started swatching. I know that I'm generally a loose knitter and that means I use a smaller needle than most so I grabbed a US4 and cast on for a stockinette swatch. I knitted away for 15 rows and then measured. The swatch was measuring five SPI but the stitches looked a lumpy so, I ripped back, stayed on 4s and knit more tightly. This attempt yielded a honest 5.5 SPI and was happy with the horizontal gauge, but again, the stitches looked lumpy - as if they were too vertically compressed. That led me to rip back again, move up to a US5 needle and end up with this result:
It's perfect. An honest 5.5 stitches per inch and I really like the proportion of the stitches versus rows and even the little bit of twisted cable looks tidy. How much do I love this swatch? This much:
And let's not even get started on the color. It's fabulous. It shines (thank you, BFL!) and it is warm as the last sunny day before winter sets in (thank you, Jennifer!). I want to pet this yarn and this swatch forever. I can't wait to make this cardigan so I can wrap myself in squishy honey. Now it's all about filling the bobbins.
Being nice
I'm going to take a brief moment to vent.
When it comes to business, I don't subscribe to the "always be nice" idea. Let me say that I do, in general, try to be kind to my colleagues. I try to communicate with them in ways that they will understand (visual vs. aural, go through pleasantries before getting down to the issue at hand; establishing relationships; yadda yadda) and make the experience of working together as easy as possible. However, I also believe that they will meet me halfway.
In the event that this state of detente cannot be reached, business still needs to be conducted. Work still must be done. Problems must be solved, products must be manufactured and money must be made. Colleagues honestly don't have to like each other, but we do need to be consistent and professional in our relationships.
Nothing, but NOTHING torques me harder than failure to follow this thinking. I simply don't understand why one person must succeed on the back of another.
There. Much better.
Spinning with a purpose
Over in Ravelry, a group of us are getting ready to do a KnitALong (KAL) with Sandi Wiseheart. End result of the KAL is a cardigan that's been designed to fit the knitter (or the knitter's intended victim) and also teach us about the designing process along the way. Sandi will be starting the KAL in August because I, hopefully along with a few others, plan to spin yarn specifically for this project.
I've started a thread on Rav for those SpinningALong (SAL) but am going to blog about it as well. That should let me ramble on a bit more and add pictures where it makes sense. Goal of this series of posts is to talk about the process of spinning for a specific project with an eye toward making a yarn that you love and that also works for it’s intended project.
I’m also working with Sandi to write up a swatch that’ll be indicative of the small amount of non-stockinette patterning that is part of her design so that you’ll be able to really get an idea of what the finished product will look like. That swatch will be posted here for all to see/use.
Full disclosure - I’m a very new spinner and I certainly don’t have all the answers! This is more of an opportunity for me to be a bit public about my thought process and hopefully give and get guidance along the way.
Jennifer and Susan will be offering dyed Blue-Faced Leicster roving in both superwash and non-superwash. Please consider purchasing through them to help support the project! Details for purchasing fiber and yarn should be available this coming Thursday, 6/24.
In an earlier post, Sandi pointed us to this Knitting Daily blog entry to help determine how much yarn will be required to knit up her cardigan. To save folks some electrons, here’s the relevant section:
Misses Sizes 32-40 Bust (for a regular, comfortable-ease pullover; add 5% for a cardigan)
* sportweight: 1400-1600 yards (1300-1500 meters)
* worsted weight: 1100-1400 yards (1000-1300 meters)
For a longer, loosely fitting, or oversized misses-sized pullover (add 5% for a cardigan)
* sportweight: 1500-1900 yards (1400-1750 meters)
* worsted weight: 1300-1500 yards (1200-1400 meters)
Since the yarn Sandi calls for is a DK/light-worsted, I’m looking at numbers between sportweight and worsted to estimate my yardage requirements. Using straight-line interpolation, I’m making this estimate:
Standard fit pullover (add 5% for cardigan): 1250 - 1500 yards (1150 - 1400 meters)
Loose-fit pullover (ad 5% for cardigan): 1450 - 1700 yards (1300 - 1575 meters)
The extra 5% nets out to less than 100 yards in all cases.
My bust size is a 34, so I start out at the low end of the yardage scale so I’ll do my estimate for a size 34 and then do some fudging from there. I’m going to shoot for 1300 yards of yarn.
Next step is to work out fiber based on that yardage requirement.
A little surveying of DK weight yarns put me in the neighborhood of 250yds per 4oz. This is a bit over-estimated and also mill-spun. Handspun is often of a lower Yards Per Pound (ypp) than millspun simply because of the way the commercial process handles fiber. Again, since I’ll be reserving for sampling and generally rounding up, I’m not going to get too hung up on this.
Ok, back to calculating.
1300 yards, divided by 250 yards = 5.2
Multiply that by 4oz = 20.8oz
16oz per pound and we get = 1.3 pounds.
Being conservative and ensuring that I have enough to sample, I should be able to get away with 1.5 pounds. But, since I’m really planing to have at it, I’m ordering 1.75 pounds. This will let me relax and make up a decent sized sample skein (maybe two) so that I can ensure I’m doing the Right Thing.
Comments/corrections/readjustments welcome.
Subscribe to:
Posts (Atom)