Showing posts with label hand-dyed wool. Show all posts

It's here! IT'S HERE!!!!!

On what has easily been the hottest day of the year, my wonderful Coffee Swap package arrived! I've been waiting ever so patiently (NOT) for this to arrive ... dreaming of yarn and coffee and other wonderful treats. Who knew that my swap partner Jenni would do such a wonderful job! Ok, start at the beginning.

I arrived home from work to find this on the doorstep - albeit out of the sun, but definitely languishing in the heat. Doesn't it look innocent? I'm terribly impressed by the detailed blow-by-blow list of the contents (no no ... no peeking for you!). Let's just say that I wasn't quite as detailed. Not like I was worried about customs or anything ... no, no. Not me. Ok - rather than heading in to the steaming house, let's head over to the backyard (better light!) where there's a little bit of a breeze to open the package.


Wow. A gift box! For those that headed over to Jenni's blog, you'll see that I was not quite so together. I recycled a box from a previous escapade and just crammed it full of goodies. "Enjoy!" Check. I'll have a good time with this one. Coffee colored ribbon ... beautiful paper ... gee!

Oh my goodness! Look at all this stuff! Yarn and coffee and balm and chocolate (uh, oh - remember I said it was really hot today?) and an espresso tumbler and a cool pen (that's going straight in to the project bag) as well as notes about the coffee and even a little "coffee and cream" coaster for the espresso cup. Amazing! Ok, let's have a look at some of this a bit more closely ...


The most important bit - the coffee. One each of a Kenya Peaberry (a single berry variety with a fruity flavor and mild acidity) and Granite City Blend (since Aberdeen is, after all, the Granite City!) If only it weren't so warm, there'd be a shot of this in the espresso maker already - and straight into the beautiful espresso tumbler she included!


Badger Sore Muscle Rub ... I think she's been reading about my turned ankle and marathon training! It says right on the label "rub it in ... you deserve it!" I sure do! Nestled right there in the background is a skein of Colinette Jitterbug yarn in the "Monet" colourway! I absolutely *adore* this yarn. One skein is enough for a pair of socks - now the only question is what to knit?


This is amazing. A ball of a wool/cashmere/silk yarn that is both undyed and unbleached. The farm from which this hails raises only rare-breed sheep in an effort to preserve them. The pamphlet says that there's a "crimp" in this yarn - I'm not sure what I'll do with this, perhaps the ladies at the knitting club will have some suggestions! It knits as a DK, so there might be enough for mitts ... particularly if I combine it with another yarn. So many possibilities!


Remember how I mentioned that it was hot? Like, 94F hot? The MacBeans are currently in the refrigerator - hopefully they'll regenerate into something more than just a mass of chocolate ... but then again, I'll enjoy it anyway! It'll be a nice treat after cooking dinner tonight.

Finally, there's also a pen as well as a wonderful recipe for Vietnamese Coffee Cupcakes to go with everything. My goodness! My cup and stash overfloweth! Thanks, Jenni, for such a wonderful gift box.

... but I love grasshoppers

Unfortunately, they don't love me. :-(

I followed the pattern. I had enough of that great yarn leftover so that I could make some matching fingerless mitts or something! I had PLANS!

Then came the bind-off. The pattern calls for a sewn bind off. I've never done this before so I'll trust the pattern. "Cut yarn leaving a 16" tail." Check. Oh, I'm doing both socks so I better cut both. Get out the handy tape measure (thanks Yarn Grove folks!) and measure 16". Add one extra for good measure. *snip* *snip*

La de dum da ... sewing away ... first half of first sock done ... (hrm, this looks a little close, hope it's ok) ... doo de doo ... first half of second sock (little gyrating with extra loops) ... hey - this looks *close* ... this looks *REALLY* close!

CRAP!

Oh. No. No. I have just a *THREAD* left and the end of the first sock and it's bound so tightly that I can't get it over my calf! The sock is saggy and ridiculous.

*SOB*!

The other yarn end is also already cut which means I am screwed on BOTH of these!

grrrrrrrrrrr

Fine. They're getting frogged and the yarn will be something else. Don't know what, but it will be something else. Here's my pathetic little sock:


The new kit is coming in a few weeks. I'll focus on my Clapotis and my June Undercover Squares. Maybe it's time for a "sock break".

Success!

I finally did it - I dyed some wool.

I've been voraciously reading all sorts of books and web sites and magazines about how to dye yarn. They went on about food color, acid dyes, protein fibers, plant fibers, dye strengths, steaming, boiling, soaking, washing - to the point where I realized that I now knew waaaaaay to much (or nothing at all) and needed to just go out and do it.

So I did.

Step 1: Yarn

I'd been trying to get my hands on some real wool at discount prices, but it just wasn't working out. That became procrastination so ... I got some el-cheapo wool/acrylic blend from my LYS. Two skeins at $4 each. Definitely not a big investment so it's fine if I screw it up. Wind the balls into a pair of skeins on the dining room table, stick in a pot of water to soak. Check.

Step 2: Dye

This is where things got crazy. I visited a semi-local establishment, Dharma Trading Company, well known for being a great place to buy dyes. Unfortunately, I did this before I had anything to dye, so I simply looked at dyes, read books, wandered about, bought nothing. After more reading, I found the PieKints blog that talks about dying with Wilton's Icing Dye. It's a highly-concentrated food color specially made for frosting. A variety of colors and totally non-toxic. Off to the local craft store - six different colors secured. Check.

Step 3: Method

I love sock yarn. The kind that changes colors and does cool things. If you read this blog at all, you know that. Ok, that means I am NOT doing the simple immersion method (too simple, after all) and I'm heading right to the "cold pour" method. Once again, it's Knitty to the rescue with a great article about food color dying here. I cleared off the dining room table, put down two big lengths of plastic wrap and I was on my way. I did a mostly blue with a quick transition to yellow. No, I didn't take pictures of anything (idiot) but then again, I had food color all over my hands and thought that would NOT go well with my digital camera. Pix at the end. I poured the dye, squished it in, rolled it up, covered with foil and baked for about 3h in a 250F oven. Open it up (oops, some of the blue leaked on the pan), rinse it out and hang in the shower to dry over night.


Step 4: Now what?

First, it became two hanks. And it looks like this:


You can see where the blue and the yellow mixed to make green. That was deliberate, actually. I knew I wasn't going to be able to keep them separate and so it made sense to force the issue by muddling the dyes. Common sense said it would become green - and it's nice to see logic in practice. I'm also happy that the dye "calmed down". I suspect that's mainly because of the high acrylic content of this yarn - and it could also be because I didn't add enough vinegar, or bake it long enough. Heck, I don't know. However, I am happy with the end result.

Better still, my winder showed up today and I made my first yarn cake - and now my two hand-dyed skeins look like this:


Will I do this again? YES!!! With what yarn? No idea. Food color definitely does NOT work on plant fibers (the cotton yarn I used to tie the skein is still crisp and white) so I'll need to stick to wool for the time being. I also need to perfect my rolling/wrapping technique so that the dye doesn't leak so much. There are droppers to buy, jars to fill and color palettes to think about. Oh, and at least one pair of socks to knit from these lovely little balls. What a cool thing - and to all of you that do this regularly ... I am amazed at the beauty of what you do. This is truly an art!

Step 5: Knit Something

I have a thought that this will be a pair of socks suitable for wearing with my thong sandals. I've only got 50g per skein of this yarn and therefore it's unlikely to go far. I like the Tropicana pattern over at Magknits. If I combine that with the toe for the Lickety Split socks from Knitty, I could be on to something. Regardless - it needs to be easy, and I need to do it soon! Thank goodness this is a holiday weekend. :-)

Monkey business ...

My first Monkey Sock is done - and boy oh boy was that ever a near thing! Before I get to that, here's some pictures of the original ball and second skein - as well as a little bit of knitting:


As mentioned last time, the wool is from Koigu and I am just amazed at how wonderfully this knits up. It's exceptionally springy and while that made for a heavier sock than I had planned, I'm still quite satisfied with it.


You can see that the twisted rib really shows the torquing that comes with knitting in the round - but that sorts itself out when worn and I also expect a good chunk of it will go away when I wash it. The twist in the wool makes the stitches really stand out - definitely a plus when working this pattern!


Very evident here - both in the heel and the gusset. As always, there's a GREAT Knitty article that talks about the types of twists in yarns and how that affects the way stitches show up in the final fabric. Based on this article, I'll say that the Koigu has a "Z-twist" and that's what gives that strong verticality to the stitching.

Now, about me running out of yarn (almost). I was up late on Friday knitting away as I knew I was very close to finishing. I had one last repeat of the lace pattern before starting the toe decreases and had been keeping an "eagle eye" on the remainder of the ball. About two or three rows in to the decreases, I squeezed the ball. PANIC!!!! There was NOT much LEFT! I've got sixteen more rows to knit and there's a real likelihood that I'll run out! I knit and knit and knit - and when I still had about 8 rows to go, I stopped. I couldn't take it at midnight on a Friday. I put down the sock and came back to it on Saturday. Here's the result:


For reference, that's an 8 1/2" x 11" piece of paper. That mini skein has, AT MOST, 2 yards of yarn. Holy cow. I've never been this close to running out before and I sure hope I don't get this close on the next one! Certainly makes a case for knitting both at the same time - but I'll also likely be knitting a little tighter on the second sock.

Regardless - progress on the Monkeys is at 60% as I've cast on the second sock and make it through the first two repeats. It looks remarkably like the topmost photo in this post. :-)

April STR Yarn Is Here!

Hooray hooray hooray! The most luscious, silky and gorgeous yarn has arrived! Here it is laid out on my coffee table for winding in to two center-pull balls:


The lighting isn't the greatest here so it doesn't show off the colors as well as I'd like. The colors go from a warm light brown, through a STUNNING fuscia in to green and blue. Amazing. The silk in the yarn doesn't take the dye like the wool so it has this really cool "tweed" effect. I just love it. After winding, I put the balls in to some natural light and they look like this:


Mmmmmmm. Gorgeous.

The pattern is another toe-up sock (hey - I like this kind of knitting) but the first few rounds of lace are hard! I'm doing 2on2 circulars and was wondering if it was just me that was struggling - nope! Rumor has it that I simply need to PERSIST and the lace will get easier. That'll give me something to do today before it's soccer time.

Anyway - thanks again STR ladies! This stuff is wonderful! (now, if only I can get my wool/bamboo cone so that I can try my own dying ...)

My Socks ROCK!

They're done. They're DONE! THEY ARE DONE!!!!

My very first pair of socks. They are squishy - and springy - and they massage my feet with every wonderful step! So, without further ado, here are some pictures.


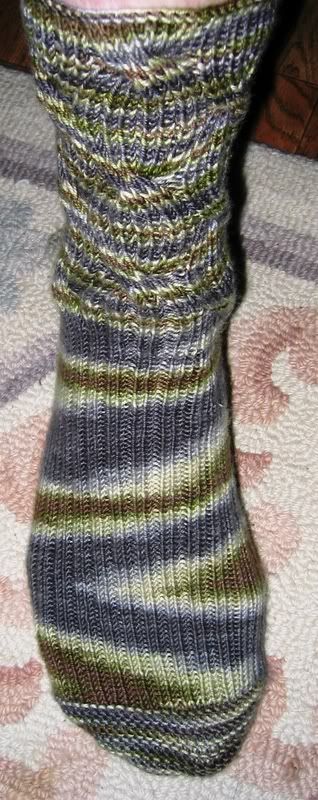
The socks were knit to be reversible, and the two sides are very distinct! The "reverse" side really shows the ribs and cables whereas the "normal" side is much more mellow. The striping is inherent in the yarn and had little to do with my knitting. I'd stitched in a few different sizes and never could really get the 'pooling' effect shown on the actual pattern. I know I'm not the only one that ended up with this color scheme; but I must admit, I really wanted to get that effect!


This is a better picture of the "normal" side and shows the cables more clearly. You can also see the ribbing that is on both the foot as well as the instep.

Another view of the leg - with a better look at the short-row heel. I really liked this heel technique. It is unbelievable SQUISHY! It was challenging to knit since it is so dense and really curled up tightly on the needles. I knit using two circulars rather than four double-points, which may have made things more challenging, but who knows? I doubt I'll go back to double-points unless I have to (and I did for my Jaywalker socks).


In this view, they are both "reversed". Again, the ribs and cables are very visible.


Finally, a close-up of the pair; one right side, one wrong side. The light is a little crummy, but so it goes.

I'm excited about next month's sock! I can't wait for the yarn to arrive and to start poring over the pattern. I'm torn as to whether or not I should splurge and order the Addi Turbo needles (everyone seems to knit on them) and give them a shot. The Crystal Palace needles that I've been using don't have a good seam between the bamboo and the cable and it's been difficult to get the yarn to slide back on to the circular.

Whatever.

It's just more money to spend on knitting foo ... right?

Turning the heel

So I've rounded the corner and am on the home stretch of the first sock. Yes, it should have been done by now, but let's just say that I'm effectively knitting three socks instead of two. :-) Also, I've had my first run-in with the 5-1-5 cable. I've been so schooled by this pattern to knit TIGHTLY that I forgot about the looseness required for easy cabling. I also don't have a cable needle that's the equivalent of a 0 knitting needle, so it's bit more "interesting". I suspect there's at least one more trip to the knitting store tomorrow to pick up some 0 double-points. Might even be easier to work the leg on double points rather than two circulars.

No pictures today - I'll take some tomorrow when I (hopefully) finish up the first sock. Then I've got to get back to my book club book. It's due next weekend!

More sizing musings - addressing the "foot"

In helping a fellow knitter with smaller feet, I've managed to work out the following to make a smaller "foot" portion of the sock.

Specifically, johussion measured her foot and got to a completed toe that is made up of 52 stitches. Looking at the STR pattern, there's an approximately 25% increase in stitch count from toe to foot to compensate for the rib and the smaller needle gage. Doing some simple math gets us to a target of 64 stitches all around for the foot (52 stitches plus 25%).

Here's the hard part - given the [p1, k2] rib on the instep and the [p2, k2] rib on the sole, it take a little fiddling to work it out. Also, the set-up row is done in groups of 7 and 8.

Using the "new math", I ended up with this for the next two rows:

Set-up round: P1, [k2, p1, k1, kfb] 5 times - 31 instep stitches. K1, kfb, [k2, p2, k1, kfb, p1] 3 times, k2, p1 - 30 sole stitches, 61 total stitches
Round 1: [P1, k2] 12 times, [p2, k2] 6 times, p1

Now, the instep will have 10 k2 ribs and the sole will have 8 k2 ribs. Knit away and turn the heel a little later - likely at 1.5" from the heel rather than 1.75", given that we're working with a smaller number of stitches overall.

Last part of the pattern is for the leg and it's worked in repeats of 24. That means trouble. We've got 61 stitches coming off the toe - and that's 13 more than two repeats and 11 less than three repeats (standard pattern has 3 repeats). Should you will fill the gaps with purl stitches? Increase around the leg to get up to 72? I really don't know. I suspect johussion and I will figure this out when she turns the heel. It's all about the sizing, you know.

Progress is being made ...

It's been three days since I received my sock yarn and I feel like I'm getting somewhere. I haven't had any large blocks of time to work on it, but it's still satisfying to see that there will be a pair of socks one day!

From some of the other knitters, I've seen some cool "pooling" of colors. Specifically, here's the first one I saw with cool "teeth" and "points". My socks, on the other hand, are looking more like ordinary "self-striping" yarns.


I'm trying to keep a positive attitude and convince myself that this color pattern is cooler than everyone else's - and also that things may be very different with the second sock! Others have advised to rewind the ball in the opposite direction (that would pose a problem with the twist of the yarn) and heck - I don't WANT to rewind the ball! It looks so good ...


Nope - I'll march on. I'll knit on (and purl on and W&T on) and see how the sock comes out. I expect to finish one of the two w/in the next day or so. Tomorrow's a vacation day from work and I'm looking forward to some concentrated knitting. It is therapy, after all.

Sizing The Sock

When trying to size the sock to fit my feet, the big thing to worry about is the size of the toe. For the February sock pattern, the toe is created by casting on stitches and then using the wrap and turn technique to create the toe. It's not a true "toe-up" pattern - it's more like a "toe around" pattern.

Measuring to confirm the size of the toe starts by figuring out how wide the toe box should be. That's accomplished by measuring across the base of the toe, as shown in this picture:


From the picture, you can see that the correct width is 4". Double that to 8" and that's the "circumference" of the toe box. Here's a picture of the finished toe (and the start of the foot):


Changing the sizing for the foot itself is a little more difficult as it requires understanding the pattern repeat. The instep is a 2 x 1 (3 stitch) repeat and the sole is a 2 x x (4 stitch) repeat. I'll talk about that when I have time later tonight.

Let the Knit-a-long Begin!

Wonder of wonders, my shipment from Blue Moon showed up today - a beautiful skein of hand-dyed merino superwash wool and a wonderful pattern for reversible socks. They look great! I'm excited to get started on the pattern, but first a picture of the skein as it arrived:


It's amazing at how soft and supple the yarn is. I always grew up with "scratchy" and rough wool - the merino blend is amazing. While hard to show, the color mix goes from gray to purple to yellow to green.


I'm now merrily winding it in to the usual ball and I'll take pictures as the sock progresses. It's so exciting! The pattern is simple and it seems like I should have no trouble getting it done before the next pattern shows up. Woo hoo!